T3 Code provides a convenient interface for working with coding agents such as Claude Code and Codex. One of its more interesting features is that the T3 client doesn’t need to run on the same computer as the agent.
That means you can start a Claude Code session on your development workstation, walk away, and continue interacting with that same session from your phone. If you only use Claude Code, you can achieve something similar using Remote Control. Other agents offer or will likely offer similar features as well. The advantage of T3 is that it integrates with many different LLM providers, currently including Codex, Claude, Cursor, Grok, and OpenCode.
The key is to think of T3 Code as having two parts:
- T3 Server runs on the computer where your source code and development tools live.
- T3 clients can run in a browser, desktop app, or mobile app and connect to that server.
Tailscale provides a secure private network between those devices without requiring you to expose T3 directly to the public Internet.
Here’s how I put it all together on Windows 11.
1. Install and Configure Claude Code
T3 supports several coding-agent providers. You don’t need Codex to use T3; Claude Code can be your only provider.
If you already use Claude Code, first verify that it’s available:
|
|
If both commands work, you’re ready to use Claude through T3.
One issue I encountered was T3 initially attempting to launch Codex even though I only wanted to use Claude. The resulting error included messages such as:
|
|
Codex is not required. Make sure Claude is enabled as a T3 provider and create your thread using Claude rather than Codex. You can disable Codex (and any other provider you’re not using) in Settings - Providers so it doesn’t confuse things.
I also encountered a situation where Claude was enabled and T3 could even update Claude, but the main screen still reported No provider available.
When troubleshooting this on Windows, verify what the process launching T3 can actually see:
|
|
This helps distinguish a Claude authentication problem from a Windows executable/PATH detection problem. Ultimately I had to update the path T3 was using to launch Claude.
2. Start T3 Code
You can install the T3 desktop application on Windows:
|
|
However, you don’t need the desktop application merely to run a T3 server. For a headless/server-oriented setup, you can run T3 using npm:
|
|
If you don’t have npx installed, run this:
|
|
You may also need to provide script execution authority:
|
|
T3 should report something similar to:
|
|
You can then open:
|
|
in your browser.
3. Add a Project
When T3 starts for the first time, you’ll see No projects yet.
Add the root directory of the Git repository you want the agent to work with.
For example:
|
|
Select C:\src\MyApplication, rather than just its src directory.
T3 associates its threads with this project directory. Claude operates against those same files, so you can continue using VS Code for editing, navigation, debugging, Git, and everything else.
The workflow becomes:
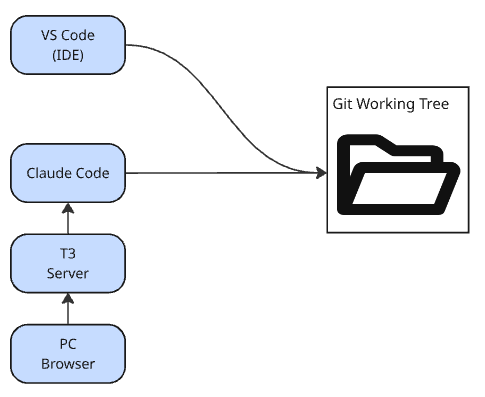
The important tradeoff is that if you want a Claude session to be remotely accessible through T3, create that session through T3. An arbitrary Claude conversation started through another frontend isn’t necessarily a T3-managed thread.
4. Install Tailscale on Windows
Install Tailscale using Winget:
|
|
Launch Tailscale and sign in.
Verify it from PowerShell:
|
|
You should see the Windows machine connected to your tailnet.
You can also see its Tailscale IP:
|
|
Tailscale’s Personal plan is sufficient for many individual setups and is free. If you initially see a trial, check the Tailscale admin console to see whether you can switch the tailnet to the Personal plan.
5. Install Tailscale on Your Phone
Install the Tailscale app on your iPhone or Android device and sign into the same Tailscale account.
Both devices should now appear in Tailscale.
At this point you have a private encrypted network between your phone and development workstation.
No router port forwarding is necessary.
6. Enable Tailscale Serve
T3 can attempt to configure Tailscale Serve itself:
|
|
However, I encountered this warning on Windows:
|
|
Rather than depending on T3 to configure Serve, I found it simpler to configure Tailscale directly.
First run:
|
|
The first time you do this, you may get:
|
|
Open the URL Tailscale provides and enable Serve.
Then run the command again:
|
|
You should get something resembling:
|
|
That means:

Importantly, Tailscale Serve makes the service available to your tailnet. Don’t confuse it with Tailscale Funnel, which is intended for publicly exposing services.
7. Make Tailscale Serve Persistent
Running:
|
|
keeps the process attached to the terminal.
Instead, configure it to run in the background:
|
|
Verify it:
|
|
Once configured this way, you don’t need T3 to manage Tailscale Serve.
Start T3 normally:
|
|
Your local browser can use localhost:3773, while remote devices use the HTTPS *.ts.net address.
8. Test From Your Phone’s Browser
With Tailscale connected on your phone, browse to the Tailscale Serve address:
|
|
You should see the same T3 environment, projects, and threads that you see on the workstation.
If this works, you’ve proven the important parts independently:
- T3 is running.
- Tailscale is connected.
- Tailscale Serve is forwarding HTTPS traffic to T3.
- The phone can reach the workstation.
9. Pair the T3 Mobile App
The native T3 application asks you to add an Environment.
Enter the Tailscale Serve address as the host:
|
|
You’ll also need a T3 pairing code.
Pairing credentials are intentionally temporary. A new client exchanges its pairing credential for its own persistent authenticated session.
Consequently, don’t expect to reuse the pairing credential you already used to connect another browser or device.
T3’s auth commands can issue additional pairing credentials:
|
|
Use the appropriate pairing-creation command from the current T3 version to create another credential for each new client.
When the UI asks for the pairing code, use the short, human-friendly T3 pairing token rather than an internal long hexadecimal credential.
After successful pairing, that device receives its own authenticated session. You shouldn’t need to re-pair it every time you reconnect. Pairing is not bidirectional. If you have two workstations and you want to be able to manage sessions on either machine from the other one, you will need to repeat the pairing process in each direction.
10. Connecting Multiple Workstations
This same design works with more than one development computer.
Each computer runs:
|
|
Each gets its own Tailscale hostname:
|
|
Your phone can then have both T3 environments configured.
A workstation can also connect to another workstation’s T3 environment. Each new client/environment relationship requires its own initial pairing credential.
This gives you a useful topology:
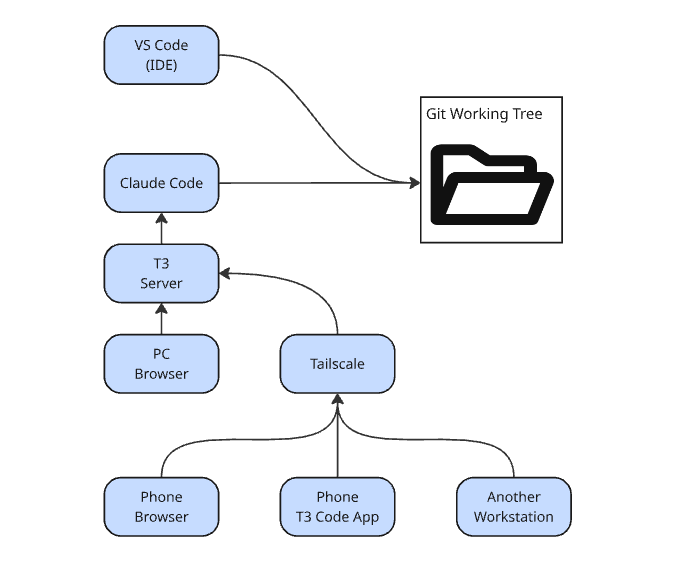
The Claude process, Git checkout, filesystem, build tools, and credentials always belong to the machine hosting that particular T3 environment.
One current usability issue is worth mentioning: T3 clients don’t necessarily provide identical environment grouping/filtering capabilities. If you have the same repository cloned on multiple machines, the desktop interface may make it difficult to distinguish those projects until you open a thread and inspect its environment.
Until that improves, adding the machine/environment as a qualifier to duplicate T3 project names can be a pragmatic workaround (e.g. name the environment “ProjectA - Machine1” instead of just “ProjectA” so they’re better differentiated in the T3 Windows app (not shown)).
11. Troubleshooting Tailscale Login
On another Windows machine, I encountered a strange situation where browser authentication succeeded but:
|
|
continued reporting:
|
|
The browser successfully authenticating doesn’t necessarily mean the local Tailscale client has transitioned into a connected state.
Check:
|
|
If necessary, explicitly bring the node up:
|
|
You can also restart the Windows Tailscale service from an elevated PowerShell:
|
|
Don’t troubleshoot Tailscale Serve until tailscale status shows that the machine itself is actually connected.
12. What Survives a Reboot?
There are several independent components involved:
|
|
Tailscale itself can start automatically with Windows.
A background Tailscale Serve configuration can persist as well.
T3 is different.
If you’re starting T3 interactively with:
|
|
then that process obviously disappears when the machine reboots.
More importantly, unattended Claude Code execution on Windows can involve user-session and authentication considerations. I found that a freshly rebooted workstation could appear reachable remotely (in T3 clients) but wouldn’t actually begin processing new agent work until the Windows user had logged in (requests would show as queued).
So don’t assume that merely starting T3 from Task Scheduler at boot completely solves unattended operation. Test Claude’s authentication and toolchain in the exact non-interactive environment you intend to use.
Future Considerations
Once T3 is working remotely, there are several interesting ways to take the idea further.
Automatically Starting T3
A Windows Scheduled Task could start T3 automatically after reboot. Ideally it would run under the same Windows account that owns the Claude authentication and development environment.
The caveat is that Claude Code’s authenticated Windows environment may behave differently before an interactive login. Test this before relying on the machine as an unattended agent host.
WSL
Running T3 and Claude inside WSL moves the agent environment into Linux, where conventional service management such as systemd is available.
That can be attractive for a workstation intended to behave more like an always-on agent server.
Keep the Git repositories inside the Linux filesystem if you’re primarily operating on them from Linux rather than continually crossing between WSL and the Windows filesystem.
Containers
Another logical step is packaging the environment as a Docker image containing:
- T3 Code
- Claude Code
- Git
- GitHub CLI
- .NET SDK
- Node/npm
- any common development utilities
Persistent volumes can hold configuration and workspaces while the container image defines the repeatable toolchain.
With an appropriate restart policy, a Linux Docker host can automatically restore the agent environment after reboot.
This opens up many hosting options: workstations, Linux machines, NAS devices capable of running containers, mini PCs, VMs, or cloud instances.
An Agent Compute Pool
Once T3 environments are portable, there’s no reason every environment has to be a primary development workstation.
You might eventually have:
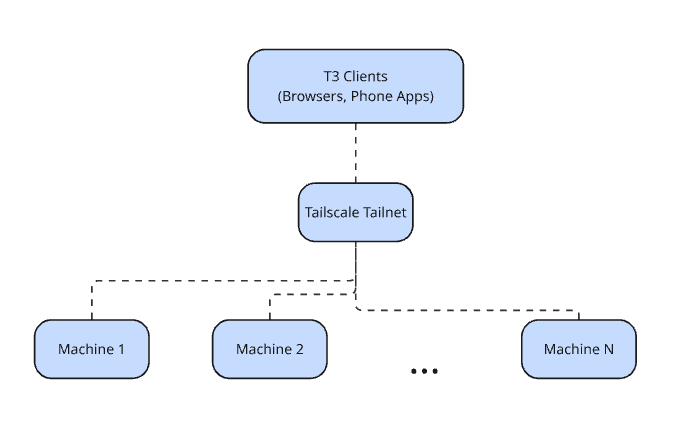
A lower-powered always-on machine could handle source changes, Git operations, documentation, and PR creation while CI performs expensive builds and integration tests. Higher-powered machines could do more extensive benchmarking and end-to-end testing. Multiple LLM subscriptions and agent types could be employed in an optimized fashion across the network.
That turns T3 from merely another coding-agent UI into a convenient control plane for multiple agent environments.
References
- T3 Code
- T3 Code - Remote Access
- T3 Code (GitHub)
- Claude Code Remote Control
- Tailscale
- Tailscale Serve
- Tailscale Serve CLI
- Tailscale Pricing